;'>ClevelandWebDeveloper.com</span><br>I enjoy designing and developing websites and have been doing that for 20 years. I also make WordPress plugins.")
The Problem
Recently I got a question from a user who wants to associate passwords with distinct purchases. The question asked was “Will I be able to track the ‘purchase’ to the password? My plan involves using passwords to associate sales with the salesperson, ie the password.”
The Solution
It turns out, this is fairly easy to set up. Note that you will have to be using Hide My Site Multipass in order to follow along with this tutorial. For the sake of example, let’s say that you have two salespeople, and that each sales person has sold two products. This means that each salesperson will have two passwords associated with them.
So in all, that would make four passwords:
Salesperson 1
Password 1
Password Label: Salesperson 1 A
Password: uniquepassword1
Password 2
Password Label: Salesperson 1 B
Password: uniquepassword2
Salesperson 2
Password 3
Password Label: Salesperson 2 A
Password: uniquepassword3
Password 4
Password Label: Salesperson 2 B
Password: uniquepassword4
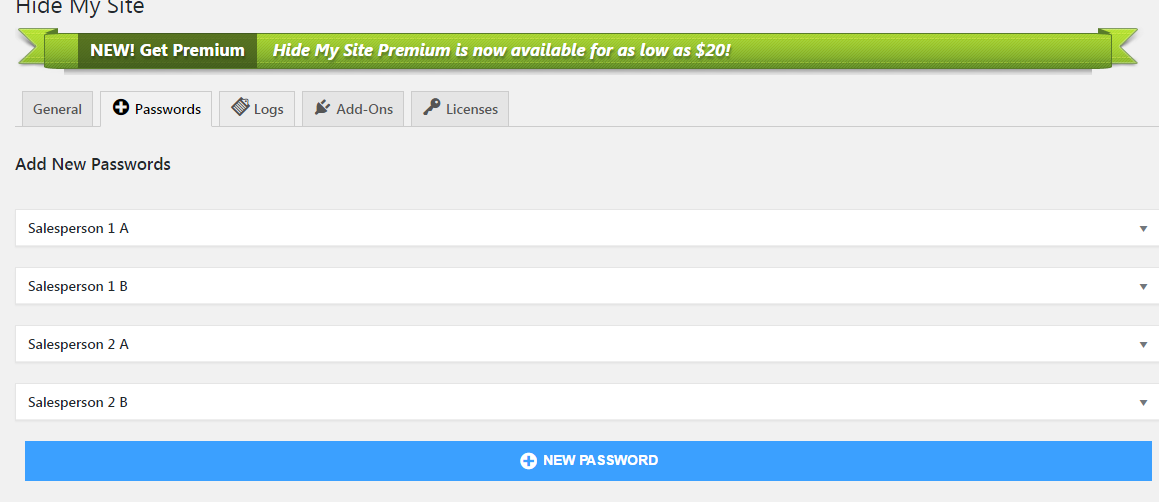
In your WordPress admin > Settings > Hide My Site > Passwords, this is how that would look:
And here is how the log ins will be recorded in the log (WordPress admin > Settings > Hide My Site > Logs)
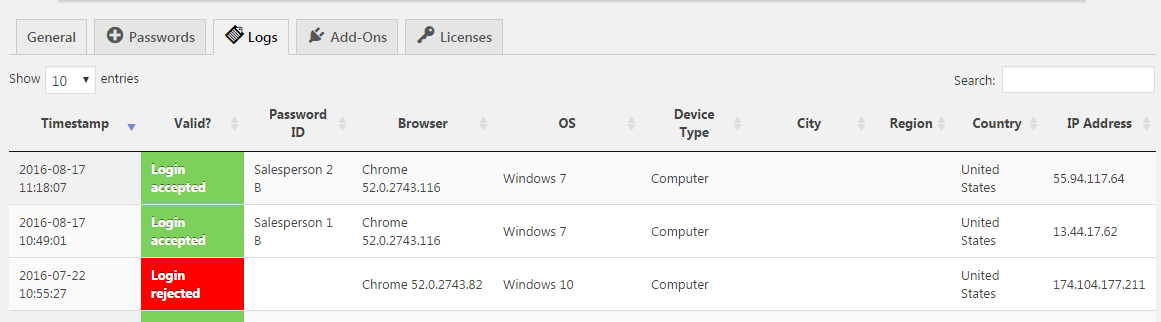
This way, you are able to tell that Salesperson 2 is associated with the first login, and that Salesperson 1 is associated with the second login. The letter B used in the password label “Salesperson 2 B” is intended to be a unique identifier for the sale, but you can use whatever you want instead. For example, You might prefer to use an order number or customer name instead, if that helps you more easily recognize the purchase in your records. Here are some other ideas for password labels that you might use:
- Password Label: Salesperson 2 40052564 (in this example, 40052564 is the order number)
- Password Label: Salesperson 2 Johnson (in this example, Johnson is the customer’s last name)
- Password Label: Salesperson 2 Johnson-40052564 (in this example, Johnson is the customer last name and 40052564 is the order number)
Thanks for taking the time to follow along with this tutorial. I hope you find it helpful. Please let me know if you have any questions or other feedback in the comments.
Related Posts
- Hide My Site Multipass
- Hide My Site Custom Login Page Examples #2
- Hide My Site Custom Login Page Examples
- Hide My Site Bypass URL
- Hide My Site Redirect
- Hide My Site
- New feature added to Multipass – Clear All Logs
- What’s new in Hide My Site version 2.1
- Will Hide My Site be Gutenberg compatible?
- How to add a hyperlink to your Hide My Site login page